Tampilkan postingan dengan label tweak. Tampilkan semua postingan

Sabtu, 09 April 2011

MT Gestures: Jailbreak App Brings Multitouch Gestures To iPhone, iPad And iPod Touch

You can follow these steps to enable the multitouch gestures:

  • Launch Cydia from home screen
  • Tap on the Manage tab
  • Then tap on Sources
  • Tap edit and then Add iphone.gsm.vn/
  • After the new source is installed, tap on the Search tab and search for MT Gestures.
  • You may get few results for MT Gestures, tap and select MT Gestures (WB)
  • Tap on the Install button in the top right corner
  • Then tap Confirm to install MT Gestures WB on your jailbroken iOS device
  • Launch Winterboard from the homescreen
  • Tap Select Themes
  • Select the appropriate option from iPhone 3GS4.3.1 Gestures, iPhone 4 4.3.1 Gestures and iPad 4.3.1 Gestures

Senin, 28 Juni 2010

HD Tune Pro 4.50

HD Tune Pro 4.50 - software gratis, serial number, crack, key,  terlengkap

DOWNLOAD HD Tune Pro 4.50

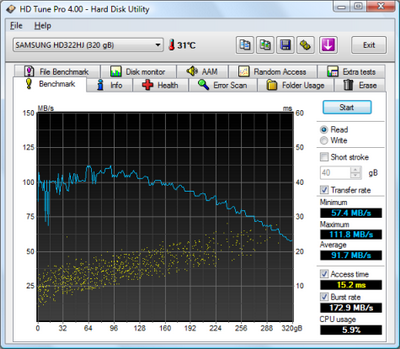
HD Tune Pro is an extended version of HD Tune which includes many new features such as: write benchmark, secure erasing, AAM setting, folder usage view, disk monitor, command line parameters and file benchmark.

HD Tune Pro is a hard disk utility which has the following functions:
» Benchmark: measures the low-level performance (read/write)
» File Benchmark: measures the file performance (read/write)
» Info: shows detailed information
» Health: checks the health status by using SMART
» Error Scan: scans the surface for errors
» Erase: securely erases all data from the disk
» Disk Monitor: monitors disk access
» Folder View: shows disk space usage for each folder
» AAM: reduces noise or increases seek performance
» Temperature display

What's new
* Added option to monitor health status during tests
* Fixed display issue with high DPI font settings

Supported operating systems: Windows 2000, Windows XP, Windows Vista, Windows 7.

Hardware requirements: hard disk (internal or external), SDD, USB stick, memory card reader.
Note: due to hardware limitations some drives may not support all functions.

Senin, 07 Juni 2010

Mengatasi masalah “Windows could not start because the following files is missing or corrupt\WINDOWS\SYSTEM32\CONFIG\SYSTEM”

Saya pernah mengalami hal ini beberapa kali , ketika akan menghidupkan kembal komputer tetapi tidak bisa masuk ke windows dan mendapatkan pesan seperti berikut di bawah :

setelah melihat pesan diatas jangan panik dulu, apa lagi langsung menginstall ulang windows kamu.

sebenernya untuk menormalkan lagi cukup mudah, agar bisa masuk ke windows lagi .

ikuti langkah2 berikut ini :

1. siapkan cd windows kamu, lalu set booting dari cd room

2. pada saat muncul opsi R=repair pertama, tekan R .

3. Tunggu beberapa saat lalu , biasanya aman di minta konfirmasi di drive mana windows terlinstall

biasanya di c , pilih #1 lalu tekan enter2 saja untuk password administrasi

- lalu ketik cd \windows\system32\config

- lalu ketik copy \windows\repair\system

- lalu copy \windows\repair\software

- keluarkan CD windows kamu dan ketik exit lalu restart PC .

pasti kamu sudah bisa lagi masuk kedalam windows secara normal.

Kamis, 27 Mei 2010

Memperpanjang Kabel Usb dengan kabel UTP

Sebenernya si udh banyak tutorial mengenai ini,tapi yah tetep lumayan lah buat di posting lagi itung2 buat yang ingin tau.Heheheh seperti yg kita tau perangkat2 dengan port usb paling panjang kabelnya 1 - 2 meter sedangkan kalo beli usb extended kayanya terlalu mahal jadi diakalin
aja lebih ok dan Manstapp!!

Gambar ini adalah kabel UTP ato lebih familiar lagi disebut kabel LAN sepanjang 20 m (cukup panjang buat flashdisk anda di taruh kerumah tetangga dan CPU nya di kamar anda) hehehehe

Nah ini dia urutan warna kabel UTP yang harus kita gabungkan dgn USB (awas jgn salah menggabungkan bisa ga konek
Nah ini kabel usb (dah tau kan?)
Potong jadi 2 itu kabel usb (kalo bisa si 1/2 nya biar kalo ada apa2 masih bisa di potong lagi)

Neh urutan kabel dari USB (ntar di gabungkan dgn UTP)
Kira2 seperti ini lah jadinya setelah di sambung
Urutan sambungan -kabel orange dan orange putih UTP ke merah usb
-kabel hijau UTP ke hijau USB
-kabel hijau putih UTP ke putih USB
-sisanya seluruh kabel dari UTP di gabung ke Hitamnya USB

NAHHH INI LEBIH SAYA ZOOMM biar jelas

ini tampak atasnya


Kalo udh ok kasi pelindung pipa paralon yang 3/4 lah biar kedap aer (kali aja USB kalian mau di taroh di atas genteng hehehhehehe.

Saya rasa sekian dulu petunjuk dari saya mudah2an berguna.karena org yang berilmu adalah org yg menggunakan ilmunya untuk kebaikan org banyak